 English
 русский
 عربى
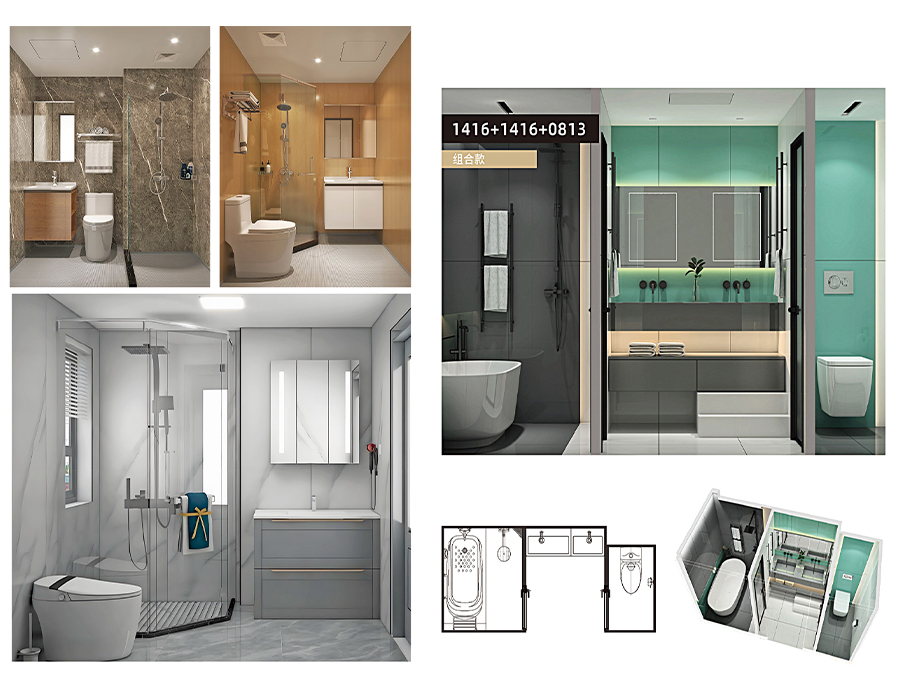
عربىInstalling a Complete Shower Room
Why Choose an All-in-One Integrated Shower Room
If you're planning a bathroom renovation, the answer is clear: an all-in-one integrated shower room is the most efficient, hygienic, and space-saving solution available today. Unlike traditional tile-by-tile wet room builds, a fully integrated unit can be installed in as little as 1–2 days, requires no grout maintenance, and delivers a seamless, watertight enclosure from day one.
These pre-engineered systems combine the shower tray, walls, door, and fixtures into a single cohesive unit — eliminating the risks of leaks, mould growth, and uneven tiling that plague conventional shower installations.
What Is Included in a Complete Shower Room Installation
A complete shower room installation typically encompasses the following components:
- Shower enclosure or cubicle (glass panels and frame)
- Shower tray or integrated floor base
- Shower door (pivot, sliding, or hinged)
- Hot and cold water supply connections
- Thermostatic or manual shower valve
- Showerhead and hand shower set
- Waste and drainage system
- Ceiling and wall panels (for fully enclosed units)
- Ventilation fan and LED lighting (in premium integrated units)
Premium models may also include steam generators, body jets, digital controls, and built-in seating, turning a shower into a full spa-like experience within a compact footprint.
Step-by-Step Guide to Installing a Complete Shower Room
Whether you're hiring a professional or tackling it yourself, understanding the installation sequence helps you plan effectively and avoid costly mistakes.
Step 1 — Plan and Prepare the Space
Measure the bathroom area precisely. Most standard integrated shower rooms fit in a 900mm × 900mm corner space, while larger models suit 1200mm × 800mm or custom dimensions. Ensure the floor is level — a tolerance of no more than ±5mm is recommended for a leak-free tray installation.
Confirm the following before ordering your unit:
- Location of existing water supply and drain pipes
- Ceiling height (standard units require a minimum of 2000mm clearance)
- Electrical circuit availability for pump-assisted or steam models
- Wall construction type (stud, masonry, or tiled)
Step 2 — Remove Old Fixtures and Prepare Surfaces
Strip out any existing bath, shower unit, or tiles in the installation zone. Inspect the subfloor for rot or water damage — repairs at this stage cost far less than post-installation problems. Ensure walls are dry, flat, and structurally sound.
Step 3 — Install the Shower Tray
Position the shower tray and connect the waste outlet to the drainage pipework. Use a spirit level to confirm the tray is perfectly horizontal. Apply silicone sealant around the perimeter where the tray meets the wall. Allow at least 24 hours for the sealant to cure before proceeding.
Step 4 — Assemble the Wall Panels and Frame
For integrated units, click or screw the wall panels into place according to the manufacturer's template. Most modern all-in-one systems use a tool-free click-lock assembly. Seal all panel joints with the supplied waterproof tape or sealant to prevent moisture ingress.
Step 5 — Connect Plumbing
Connect the hot and cold water supplies to the shower valve. Use compression or push-fit fittings as specified. Test all connections under pressure before closing any access panels. A professional plumber should handle this step if you are not experienced — improper connections can result in water pressure loss of up to 40% or hidden leaks.
Step 6 — Install the Door and Fixtures
Hang the shower door according to the supplied hardware. Adjust hinges for a flush seal. Fit the showerhead, hand shower, and any additional body jets. Attach control panels or digital displays per the wiring diagram.
Step 7 — Final Checks and Commissioning
Run the shower at full flow for at least 5 minutes and inspect all joints, seals, and the tray perimeter for any signs of leakage. Check that the door closes and seals correctly with no drips onto the bathroom floor. Verify ventilation and lighting functions operate as expected.
Key Dimensions and Space Planning Reference
| Shower Room Type | Minimum Floor Area | Ideal For | Typical Door Width |
| Corner Quadrant | 900mm × 900mm | En-suites, small bathrooms | 560–590mm |
| Rectangular Alcove | 1200mm × 800mm | Family bathrooms | 600–800mm |
| Walk-In Wet Room | 1400mm × 900mm | Master bathrooms, accessibility needs | Open entry |
| All-in-One Integrated Pod | 900mm × 900mm | Apartments, hotels, compact refurbs | 560–640mm |
Common Installation Mistakes and How to Avoid Them
Many shower room problems stem from avoidable errors during installation. The most frequent issues include:
- Unlevelled tray: Even a 3mm slope toward the wall instead of the drain will cause persistent pooling. Always double-check with a spirit level before sealing.
- Insufficient silicone at joints: Skipping or rushing sealant application is the leading cause of shower leaks within 12 months of installation.
- Incorrect water pressure: Integrated shower systems often require a minimum dynamic pressure of 1.0 bar. Low-pressure homes may need a pump booster.
- Wrong panel adhesive: Using general construction adhesive instead of bathroom-grade, moisture-resistant adhesive leads to panel delamination within months.
- Ignoring ventilation: Without adequate extraction, steam rooms and enclosed shower pods accumulate condensation that damages adjacent walls and ceilings over time.
Maintenance Tips to Extend the Life of Your Shower Room
An integrated shower room requires minimal maintenance compared to a tiled enclosure — but a few habits will keep it looking and performing like new for 10 years or more:
- Squeegee glass panels after every shower to prevent limescale build-up.
- Clean drain filters monthly to prevent blockages from hair and soap residue.
- Re-apply silicone sealant at tray joints every 3–5 years as a preventive measure.
- Use pH-neutral cleaners only — acidic or abrasive products damage acrylic trays and aluminium frames.
- Inspect door seals and hinges annually; replace rubber seals if they show cracking or shrinkage.
- Descale the showerhead every 6 months in hard water areas to maintain optimal flow rate.
Benefits of an Integrated Shower Room Over a Traditional Build
The advantages of a purpose-designed integrated unit go well beyond convenience:
| Feature | Integrated Shower Room | Traditional Tiled Shower |
| Installation Time | 1–2 days | 5–10 days |
| Grout Maintenance | None required | Regrout every 2–5 years |
| Waterproofing Risk | Factory-engineered seals | Dependent on installer skill |
| Mould Resistance | High (no grout lines) | Moderate to low |
| Customisation | Modular options available | Highly customisable |
| Long-Term Cost | Lower maintenance cost | Higher due to upkeep |
FAQ — Installing a Complete Shower Room
Q1: How long does it take to install an all-in-one integrated shower room?
Most standard integrated shower rooms can be fully installed within 1 to 2 days, including plumbing connections and silicone curing time, compared to 5–10 days for a traditional tiled build.
Q2: Do I need a professional plumber to install an integrated shower room?
The plumbing connections — particularly water supply and drainage — should be handled by a qualified plumber. Panel assembly and door fitting are often DIY-friendly, but always check local building regulations.
Q3: What water pressure is required for an integrated shower room?
Most units require a minimum dynamic water pressure of 1.0 bar. If your home has low pressure, a shower pump or booster can be installed to meet this requirement.
Q4: Can an integrated shower room be installed in any bathroom size?
Units are available from 900mm × 900mm for compact en-suites up to custom dimensions for larger spaces. Always measure your available floor area and ceiling height before selecting a model.
Q5: How do I prevent leaks after installation?
Ensure the shower tray is perfectly level, apply bathroom-grade silicone sealant to all joints, and allow a full 24-hour cure time before using the shower. Inspect all connections after the first full use.
Q6: How often does the sealant need replacing?
As a preventive measure, re-apply silicone sealant at the tray perimeter every 3 to 5 years, or sooner if you notice any cracking, discolouration, or separation.
Q7: Are integrated shower rooms suitable for hard water areas?
Yes, but regular descaling of the showerhead and glass panels is recommended every 6 months in hard water regions to maintain performance and appearance.
-
 What Are the Key Benefits of Using PEC Wall Panels in Prefabricated Kitchen Pods?
Introduction: Revolutionizing Kitchen Construction with Integrated Solutions The construct...
READ MORE -
 What Are the Key Benefits of Using PEC Wall Panels in Prefabricated Kitchen Pods?
1. Introduction In modern construction and interior design, walls are no longer just for d...
READ MORE -
 What Are the Key Benefits of Using PEC Wall Panels in Prefabricated Kitchen Pods?
Introduction The construction and interior design industries have witnessed a remarkable s...
READ MORE -
 What Are the Key Benefits of Using PEC Wall Panels in Prefabricated Kitchen Pods?
What is a PEC Wall Prefabricated Kitchen and Why is it a Game-Changer? The modern housing ...
READ MORE

-
 16 Jul, 2026
 -
10 Jul, 2026
-
09 Jul, 2026
-
07 Jul, 2026
-
02 Jul, 2026
-
24 Jun, 2026

Copyright © 2025 Jiangsu Kounor Home Technology Co., Ltd.
All Rights Reserved.
Custom Prefabricated Restroom Building, Prefabricated Kitchenette Suppliers
